Homemade Yogurt: Plain and Simple

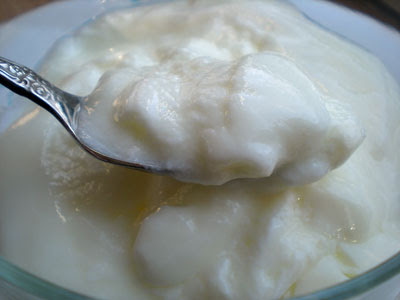
I have a thing for yogurt. I love it. I eat it for breakfast almost every day. My yogurt of choice is plain and nonfat with fruit. (Sure, of course, the full-fat version is utterly delicious, but I don't count yogurt among my list of indulgence foods.) I love thawing a handful of frozen raspberries with some dark cherries in the microwave and spooning my yogurt over these, with or without a drizzle of honey. (Frozen fruit, thawed, releases more juice than fresh fruit does.) If we have strawberries from the backyard bed in season, I'll eat those with my yogurt, and maybe a sliced banana. Or stone fruits, or even some canned crushed pineapple packed in juice.
Yogurt, though getting a popularity boost from the 1970s health food initiative and continuing from there on a head of steam generated largely by novelty flavors and convenience packaging, was actually around for a long time before that. Thought to have originated in the Middle East sometime around 2000 B.C., it was most likely a serendipitous accident of environment plus foodstuff plus friendly bacteria. Folklore paints a picture of a Turkish desert nomad traveling with a skin bag containing milk strapped to his ride. The desert heat combined with the gentle churning motion of the animal's gait and the bacteria present in the skin bag caused the natural souring ~ but not spoiling ~ of the milk. Voila, yogurt!.
Yogurt, especially the plain, nonfat variety, is loaded with good stuff like calcium, protein, and probiotics. It's traditionally thought to treat a host of ailments from intestinal maladies to insomnia. I can't speak to its medical claims, but I do know that I love a good bowl for breakfast, and making your own is simple, economical, and a good way to keep the fridge stocked with yogurt.
Homemade Yogurt
- 4 cups milk (I use skim)
- 1/4 to 1/3 cup nonfat dry milk
- 1/2 cup plain yogurt with active cultures (this will act as your starter)

- Pour 4 cups of milk into a clean saucepan and add the dry milk. Stir to dissolve. Heat milk on medium heat, stirring occasionally, until just below scalding. Milk should reach a temperature of about 185 degrees F on an instant-read thermometer.
- Remove pan from heat, set a cover over pot at angle to let steam escape, and allow to cool to between 100 and 110 degrees F. This temperature range is critical ~ cooler than 100 degrees F and the yogurt cultures won't be warm enough to multiply prolifically. Too much warmer than 110 degrees F will cause the cultures to die off. If you want to hasten the cooling stage, set pan of milk into an ice-water bath and stir every few minutes, taking the temperature of the milk periodically with an instant-read thermometer.
- When milk is between 100 and 110 degrees F, take 1/2 cup of plain yogurt (your starter) and place it in a clean 1-cup glass measuring cup. Ladle 1/2 cup of the warm milk into the yogurt and stir to integrate. Gently pour this mixture into the pot of milk and stir gently to combine.
- Pour milk-and-starter mixture into yogurt maker and process according to manufacturer's instructions. {Note: If you do not have a yogurt machine, you can still make your own yogurt. My grandfather used to make his own yogurt by setting out milk and starter cultures in mason jars on a sunny kitchen windowsill. Check out this article for tips on how to make your own yogurt without a yogurt maker.}
- Yogurt will get firmer ~ and more tart ~ the longer it is processed. It will also firm up more in the refrigerator, after the processing time is complete.
Makes 1 quart.
Recipe Notes:
- Regarding milkfat, you can go according to your preference. I use skim milk, but whole, 1%, or 2% all work well.
- You can use any live-culture-containing plain yogurt to act as your starter. My favorites are Brown Cow and Stonyfield Farm, which both contain several beneficial probiotic cultures. Once you've made a batch of your own yogurt, you can set some of that aside to use as a starter for your next batch.
- If you want to add honey, fruit, maple syrup, jam, or other sweeteners to your yogurt, wait until after it's finished. My yogurt maker produces one full quart at a time, and I leave it plain and flavor it per serving. If you have a yogurt maker that produces small individual portions, don't add flavorings until after the yogurt-making process is complete, unless the manufacturer's instructions indicate otherwise.
- Homemade yogurt should smell and taste just like the store-bought stuff. Which is to say, if it has an "off" odor or tastes bad, discard it and start over. Yogurt should taste like yogurt, not like spoiled milk!
- Don't jostle your yogurt while it is setting ~ even a little bit of movement can cause the whole batch to remain loose.
- Once you've made a quart of yogurt, what do you do with it, if you can't consume that much yogurt in a timely fashion? No problem. Use it as you would buttermilk or sour milk in recipes. Make dip. Try your hand at making yogurt cheese. I could give you a nice long list of possibilities, but really, I think you'll have the opposite problem ~ your supply won't be able to keep up with your demand.


Wow, I didn't even know there was such a thing as homemade yogurt! I bet it tastes way better than storebought.
ReplyDeleteI'm with you, Sandy. I love to make my own yogurt too. It's always so light and silky! And, no icky fillers or stabilizers either.
ReplyDeleteHmm.. I think I'm going to have to look into a yogurt maker. That's one kitchen gadget I don't own!
ReplyDeleteI've been dying to make my own yogurt! Thank you so much for the insightful directions.
ReplyDeleteBest,
Emily
www.justeatfood.com
I did not know you could make your own yogurt! Incredible. I have been on a HUGE MEGA plain yogurt kick. I thought, oh, oh. Am I preggers again? Uh, no. Just addicted to yogurt. I am gonna get some now. I am eating it plain with grapes thrown in!
ReplyDeleteThis is a great tutorial on making yogurt, thanks for sharing. I have recently been reading "French Women Don't Get Fat" and the author talks of making one's own yogurt. I have been buying plain Greek yogurt and eating it with a little honey and grape nuts in the morning. But I think making it would be something I would like to try someday.
ReplyDeleteOoh, very cool to make your own! My husband has been making ghee so I bet he'd like to make yogurt. Myself, I don't do dairy, but he loves it. Thanks!
ReplyDeleteVery cool, I didn't yogurt was so easy!
ReplyDelete~Thanks, all! Homemade yogurt is so much nicer than the store-bought variety. Tastes fresher, "friendlier," and smells more milky than sour. Tough to explain it, but if you have a chance to get your hands on a yogurt machine and have the room for *one more appliance* I definitely recommend picking one up. (You can always ditch the bread maker! You don't need it. Go to www.bakersbench.blogspot.com to see how easy it is to BYOB.)
ReplyDeleteCheers,
Sandy
Hi! I have been making my own yogurt for a couple of months and love it! I wondered if you might know how to make the yogurt creamier? I love the non-fat Fage Greek style, but can't get mine quite as creamy. I use non fat organic milk and either yogurt starter or Fage yogurt. It tastes good, but just not quite as creamy. Do you have any suggestions? Thanks! Jeri
ReplyDelete~Jeri: You can try straining your yogurt when it's finished setting, just as if you were making yogurt cheese but for less time. (I use a few coffee filters lining a small sieve.) This will give you a thicker yogurt with a creamier texture. You can find more directions on my post about making Mixed Berry Yogurt Cheese, if you'd like. http://realfoodforrealpeople.blogspot.com/2008/08/mixed-berry-yogurt-cheese.html
ReplyDeleteHope that helps ~ let me know how you make out, if you try it.
Best,
Sandy
thanks - that sounds like a good suggestion! I checked your the yogurt cheese recipe out and it sounds delicious! Thank you! I love your website!
ReplyDelete