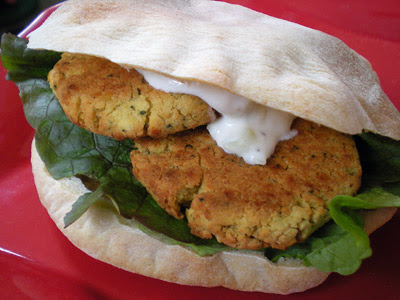
Easy Water Bagels

I don't think anyone would argue that there are way too many catalogs circulated through the mail. My mailbox is too often burdened with glossy catalogs for clothing I'd never wear, computer equipment I'd never buy, and interesting overpriced gadgets I'd never use. But there is one catalog I not only asked for, but I welcome each time it appears in my mailbox.
The Baker's Catalogue from King Arthur Flour isn't just a way to shop for the company's flours, mixes, and tools. Scattered throughout the pages are recipes from the King Arthur test kitchens. It was in one of these catalogs that I found the recipe for these Simple Bagels. Never having made bagels before, the word "Simple" in the title hooked me, and I decided the time had come to get to know the process of making a water bagel.

Rather than type out the complete recipe here, I'll refer you directly to the King Arthur site, which has a printable version.
Recipe Notes:
- I did not have non-diastatic malt powder, so I used brown sugar in the boiling water. Speaking of which, the water should be at a very, very gentle boil - more of an enthusisatic simmer. I used my electric skillet to boil the bagels in, which worked great.
- I made three varieties of bagel: plain, poppy, and salt. To help the toppings adhere better, I brushed the bagels (after 15 minutes of baking, per the recipe) with a mixture of 1 egg white and 1 teaspoon of cold water, whisked together with a fork.
- I made these before I got my stand mixer, so the toughest part of the whole process was kneading the dough. Fortunately, my soux chef was on duty, and if you are without benefit of a reliable mechanical mixer, I highly recommend recruiting the assistance of a willing and able-bodied offspring. Bribing with the first pick of warm bagels is optional but effective - possibly essential (this is a pretty stiff dough).
- Remember to leave plenty of time for this recipe - there's not a lot of hands-on labor, but the starter needs to ferment overnight, and there are three separate proofing stages.


Enjoy your bagels fresh or freeze them for the future. Salt bagels, however, don't keep well as the salt tends to draw moisture and make the bagels wet. Eat your salt bagels fresh and warm!


On my list of things to do is 'make bagels.' Can't wait to do that someday. These look great!
ReplyDeleteI welcome that KA catalogue too. Just got a box in the mail from those folks :)
I've had luck with getting the toppings to adhere by pressing the bagels, still moist and sticky from their boil, into a shallow dish of whatever you're using. Works beautifully.
ReplyDeleteOh my gosh...that is so intimadating!
ReplyDeleteWhat fun!! We eat way too many bagels in our house. I may just have to start making my own. I love the phrase "enthusiastic simmer."
ReplyDeleteThat's so cool! I've never made bagels myself, I always thought they would be too complicated.
ReplyDelete~RecipeGirl: There are so many things in that catalog that I long for! I'll take one of everything. :)
ReplyDelete~Anonymous: That's a great idea - thanks! Will try it next time I make these.
~Eat!: Thank you! :)
~Patsyk: I thought they'd be really tough, but this is an easy recipe to get started with. Give it a shot - and let me know how it turns out!
I LOVE bagels! I would never thought of making my own but there's nothing like smell of freshly baked bagels...
ReplyDeleteYour bagels look terrific! So yummy!
ReplyDelete~ingrid
Sandy - those bagels look fabulous! Wish I could walk right over to your place and grab one with a starbucks latte. :) I like mine with everything on them and cream cheese!
ReplyDeleteBagels! I'm so impressed! I've always wanted to try making them myself. They look amazing!
ReplyDeleteYou make bagel-making look really easy and fun. I'm really particular about my bagels and I shun what is in the stores. I'm going to put some bagels on my to-do list and remember this post when I get around to it. Thanks!
ReplyDelete~Maris: Seriously, the smell of these baking is almost as good as eating them!!
ReplyDelete~Ingrid: Thank you!
~Peggy: You bring the lattes and I'll bring the everything bagels and cream cheese!
~SGCC: This recipe is a great place to start. If you have a stand mixer, it's a piece of cake. Really, they're so good - and it's not nearly as tough as you might think.
~Meryl: Great! Let me know how your bagels come out! Have fun with them!
Beautiful bagels. You've inspired me to try that recipe soon. I love King Arthurs Flour.
ReplyDeleteNice crust. Could use a few for tomorrow morning with a thick dab of butter :)
ReplyDeleteKing Arthur, here I come...these look amazing!
ReplyDeleteI loved the comment about finding a well-bodied offspring for the kneading (in place of mixer). Quick anecdote: my mom would make several loaves of home-made bread each Christmas...I still get a kick out of the story that one year she let my brother stay home from school on a Friday in exchange for him helping her do all the kneading...
Ok, I don't know if I didn't knead these long enough or what but they turned out hard as a rock. Very disappointed spending this much time on them and they didn't come out. Any tips?
ReplyDeleteThey turned out perfect! A lot of work but look at the rewards!
ReplyDelete~Bake-En: Thank you! The KA Web site has great recipes with step-by-step pics that are really helpful if you've never made the item before. Their whole wheat flour is my favorite!
ReplyDelete~Jude: Thanks - that's how I like them myself. Buttery!
~Lady Baker: Ha-ha! Obviously, it's a time-honored mom tradition! :)
~Lucysmom: Dang! Hmmm, let's see if we can figure out what went wrong. If you don't mind, I'll ask a few questions that will help me figure out what might have happened: Did you use regular flour or bread flour? (That would make a difference in the kneading time required.) Did these rise nicely? How big were they/how many did you get from the batch? Were they hard on the outside only or all the way through?
~Tartelette: I have to say, once I got the stand mixer, these became so much easier. And cheaper, too, than the store-bought version. Now the toughest thing is planning - yeast doughs are so time-specific! :)
I love the look of your bagels. Hope I can find the time to make them this weekend. I want ham and cheese and maybe some blueberry ones.
ReplyDelete